
F430 FFB - Racing wheel TRUSTMASTER - Free user manual and instructions
Find the device manual for free F430 FFB TRUSTMASTER in PDF.


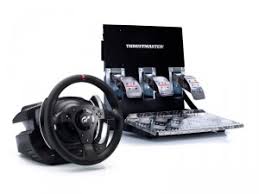
| Product type | Racing wheel with force feedback |
| Brand | TRUSTMASTER |
| Model | F430 FFB |
| Category | Racing wheel |
| Compatibility | PC Windows XP/Vista |
| Rotation angle | 270° |
| Force feedback type | Gear Force Feedback |
| Pedal set | 2 pedals (accelerator and brake) in separate or combined mode |
| Number of buttons | 10 digital buttons + 1 D-pad + 2 sequential shifters + 5-position Manettino |
| Manettino | 5-position rotary switch with integrated push button |
| Mode slider | Manual (MM) or Automatic (AM) |
| PC connection | USB 2.0 |
| Power supply | External AC adapter |
| USB cable length | Approximately 2 m |
| Dimensions (wheel) | Approximately 30 x 25 x 25 cm |
| Weight (wheel + pedal set) | Approximately 2.5 kg |
| Mounting system | Desk or table via metal screw; cockpit via 2 M6 screws |
| Calibration | Automatic upon connection |
| Cleaning | Soft dry cloth; do not use solvents |
| Safety instructions | Keep away from young children; unplug adapter during prolonged inactivity |
| Warranty | 2 years |
| Technical support | Thrustmaster website, email, phone |
| Spare parts | Contact technical support for any parts |
Frequently Asked Questions - F430 FFB TRUSTMASTER
User questions about F430 FFB TRUSTMASTER
0 question about this device. Answer the ones you know or ask your own.
Ask a new question about this device
Download the instructions for your Racing wheel in PDF format for free! Find your manual F430 FFB - TRUSTMASTER and take your electronic device back in hand. On this page are published all the documents necessary for the use of your device. F430 FFB by TRUSTMASTER.
USER MANUAL F430 FFB TRUSTMASTER
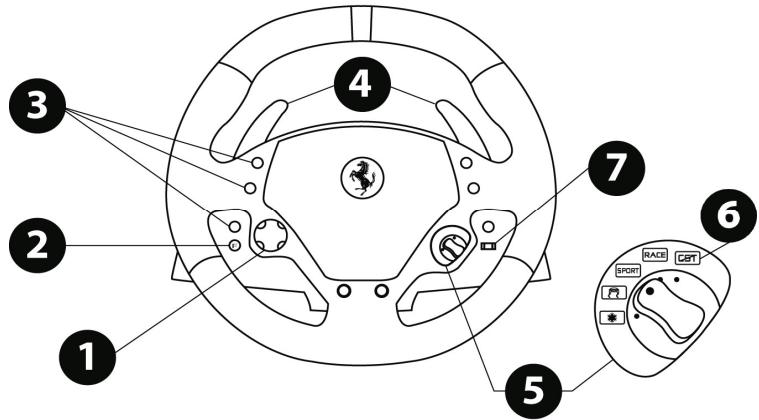
- One 5-position rotary switch
- One pushbutton
6 indicator
7 Mode selection slider:
- Manual Manettino (MM)
or
Automatic Manettino (AM)
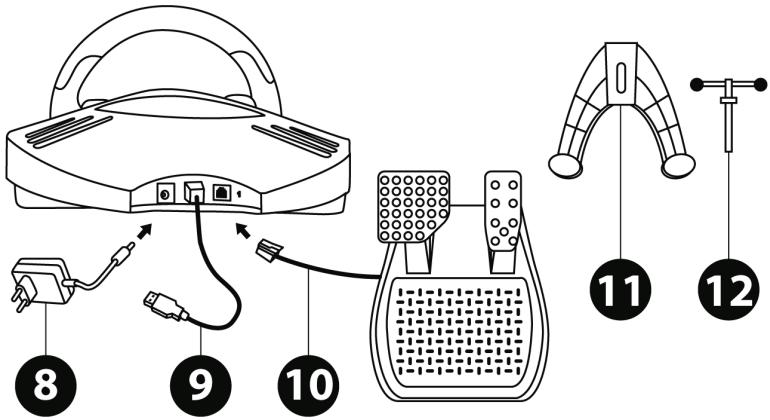
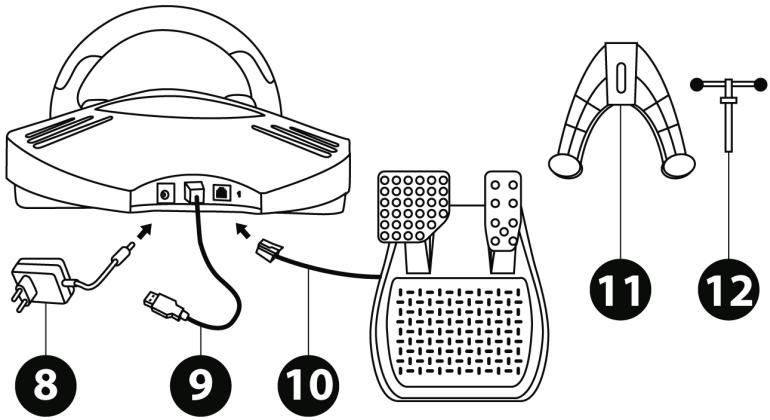
8 Power adapter
9 USB cable and connector
10 Pedal set cable and connector
11 Attachment system
12 Metal fastening screw
SETTING UP YOUR RACING WHEEL
Place the racing wheel on a table or a desktop
- Place the racing wheel on a table or any other horizontal, flat and stable surface.
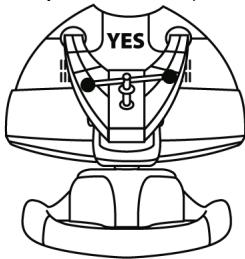
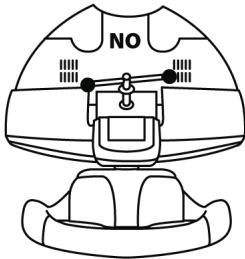
- Insert the fastening screw (12) in the attachment system (11), then tighten the fastening screw (by turning it counter-clockwise) so that it feeds into the large threaded hole located beneath the racing wheel, until the device is perfectly stable.
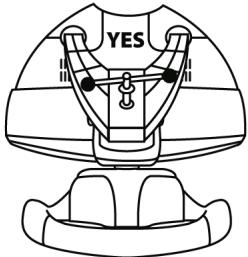
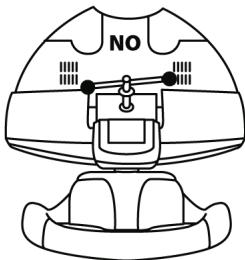
WARNING: Never tighten the screw alone, without the attachment system!
(You risk damaging your racing wheel!)
| ATTACHMENT / REMOVAL | DIRECTION |
| To tighten: Screw counter-clockwise | |
| To release: Unscrew clockwise |
Attaching the racing wheel to a cockpit
- Place the racing wheel on the cockpit shelf.
- Place two M6 screws (not included with the racing wheel) through the cockpit shelf and insert them in the two small threaded holes located beneath the racing wheel.
Connect the pedal set and the power adapter to the racing wheel
- Connect the pedal set to the racing wheel using the relevant connector (10) located at the back of the racing wheel.
- Connect the power adapter (8) using the relevant connector located at the back of the racing wheel.
- Connect the power adapter to a standard power outlet.
PC INSTALLATION
System requirements: PC (Windows® XP or Vista) featuring a USB port.
The CD-ROM included with this product allows users to install the Force Feedback drivers.
- Insert the installation CD-ROM in your CD-ROM drive. Follow the instructions provided onscreen to install the Force Feedback drivers. Once the installation is finished, click Finish and restart your computer.
- Once your computer has restarted, connect the USB connector (9) to one of the USB ports on your CPU. Windows® XP or Vista will automatically detect the new device.
- Installing the drivers:
Driver installation occurs automatically. Follow the instructions displayed onscreen to finalise the installation.
- Select Start/Settings/Control Panel, then double-click Game Controllers (or Gaming Options, according to your operating system).
The Game Controllers dialog displays; the racing wheel appears onscreen, with the status indication "OK".
-
In the Control Panel, click Properties to configure your racing wheel:
-
Test Device: Enables you to test and view the 5-position Manettino controller, the buttons, the D-Pad and the racing wheel and pedal set axes.
- Test Forces: Enables you to test 8 force effects and to configure the Force Feedback and Automatic centering effects.
You are now ready to race!
AUTOMATIC RACING WHEEL AND PEDAL SET CALIBRATION
The racing wheel calibration occurs automatically when you connect the racing wheel's power adapter and USB connector. (This operation causes the racing wheel to move.) The pedal set calibration also occurs automatically; simply depress the pedals a few times.
CONFIGURING THE PEDAL SET
By default, your racing wheel's accelerator and brake controls operate in "Separate" mode; this setting means that the pedals operate on independent axes.
This mode considerably improves precision when racing.
If your game is not compatible with the "Separate" mode, the pedal set connected to your racing wheel will not operate correctly. You will then need to exit the game and select the "Combined" mode (in which both pedals operate on the same axis).
| PEDAL SET MODE | CST |
| SEPARATE (this mode is recommended for most games) | RED |
| COMBINED | GREEN |
- SETTING THE PEDAL BASE MODE USING THE SOFTWARE
(This setting is stored in the device's memory, even after you restart your computer or disconnect and reconnect your racing wheel.)
- On Page 1 of the Control Panel interface: select the required mode, then click OK.
- SETTING THE PEDAL BASE MODE USING THE HARDWARE
(This setting is not stored in the device's memory: it must be performed every time you start your computer up or disconnect the racing wheel.)
- Simultaneously press and release: both pedals (accelerator and brake) and the Force button (2)
Note:
If your game is not compatible with the pedal base's "Separate" mode, we recommend you switch your racing wheel to the "Combined" mode.
SETTING THE AUTOMATIC CENTERING FEATURE
By default, the racing wheel's automatic centering feature is deactivated.
Most recent games feature their own automatic centering mode.
It is therefore strongly recommended (in most cases) to deactivate the racing wheel's automatic centering feature and let your game manage this feature. The Force Feedback quality will be improved.
The automatic centering mode should essentially be used with games that do not feature a Force Feedback option, or feature only a "weak" automatic centering feature.
- SETTING THE AUTOMATIC CENTERING FEATURE USING THE SOFTWARE
- Access Page 2 of the Control Panel interface.
- To deactivate the automatic centering feature, select "By the game".
- To activate the automatic centering feature, select "By the wheel".
In this mode, you can adjust the automatic centering feature's intensity, from 0 to 100% .
- SETTING THE AUTOMATIC CENTERING FEATURE USING THE HARDWARE
To activate or deactivate the automatic centering featuring directly within your game, simply press the Force button (2) on your racing wheel. When activated, the automatic centering feature's intensity matches the value previously defined for the "By the wheel" setting in the "Control Panel" interface.
| AUTOMATIC CENTERING | CST |
| INACTIVE (This mode is recommended for all Force Feedback games) | NOT FLASHING |
| ACTIVE | FLASHING |
ADJUSTING FORCE FEEDBACK EFFECTS (on Page 2 of the Control Panel interface)
4 settings are available, from 0 to 150%
- Main forces
- Static forces
- Dynamic forces
- Aggressiveness
Note:
Always remember to close the Control Panel interface entirely before launching your game!
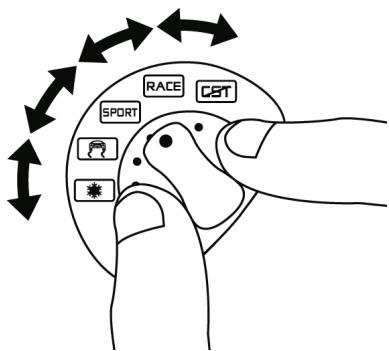
USING THE 5-POSITION MANETTINO CONTROLLER
The 5-position Manettino controller enables you to adjust your car's settings during a race. The 5 positions match action buttons 13, 14, 15, 16 & 17 on your racing wheel.
The Manettino system comprises the following:
- A rotary switch that you can move from one position to another
- A pushbutton located beneath the switch
2 operating modes are available:
- Manual mode
- Automatic mode
TO FULY UNDERSTAND THE OPERATION OF THE MANETTINO CONTROLLER, TEST IT (IN BOTH MANUAL & AUTOMATIC MODES)
VIA THE RACING WHEEL'S CONTROL PANEL INTERFACE
(i.e. the Game Controllers interface in Windows®)
MANETTINO IN MANUAL MODE
(This mode is recommended and compatible with most simulation games)
1) Move the slider (7) to MM (Manual Manettino)


This mode allows you to allocate any required features to the Manettino controller's 5 icons.
In this mode, the required feature is performed when you press the pushbutton (and not when you turn the switch) after placing the switch on the relevant icon.
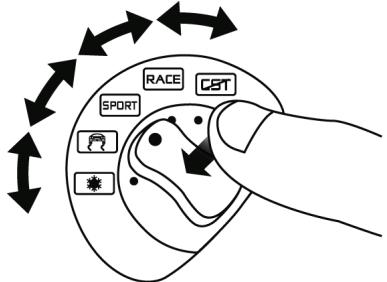
2) To program the required feature, access your game's options or controller management interface, then configure the Manettino controller with the required settings.
| 5 icons | Programming examples and available settings |
| CST | Anti-lock braking: Deactivated / Low / High |
| RACE | Stability Control: Deactivated / Low / High |
| SPORT | Driving assist: Deactivated / Low / Medium / High |
| Traction and control system: Deactivated / Low / Medium / High | |
| Braking assist: Deactivated / Low / High |
When racing, to activate and adjust the required feature:
-
Place the switch on the relevant icon
-
Then, press the pushbutton once or several times
Many other configurations can be defined according to the features available in your game's options or controller management interface (e.g. braking force distribution, tire pressure, selecting cockpit view or other more basic features).
MANETTINO IN AUTOMATIC MODE
(This setting is recommended for games preconfigured for your racing wheel's Manettino controller)
Move the slider (7) to AM (Automatic Manettino)



This mode is mainly intended for game developers, who can define preset features for each of the controller's 5 positions.
In this mode, the programmed feature is activated as soon as you place the switch on the relevant icon.
You can then use the pushbutton (while leaving the Manettino controller on the same icon) to repeat or adjust the feature.
TROUBLESHOOTING
- The racing wheel and pedal set do not operate correctly, or calibration seems incorrect:
Turn off your computer, disconnect your racing wheel entirely, reconnect all cables (using the power adapter and the pedal set), then restart your computer and launch your game again.
If this fails to solve the problem, download the manual calibration software Thrustmaster Calibration Tool v 1.03, available here: http://ts.thrustmaster.com.
- The racing wheel moves on its own during gameplay:
This is normal; it is caused by the automatic centering feature that is available in some games. To stop these movements, simply place your hands on the racing wheel or reduce the Force Feedback feature's intensity.
- The racing wheel remains locked to one side (left or right) after I launch the game:
This is normal in some games. The racing wheel will center automatically as soon as you have declared it as your racing wheel in your game's options management interface.
- The racing wheel is detected by my computer but does not work with my game:
Open your game's options management interface to configure your racing wheel. Please refer to your game's user manual or online help for more information.
- The Force Feedback feature does not react correctly:
In the racing wheel's Control Panel interface (i.e. the Game Controllers interface in Windows®), restore all
forces to their default value (100%) and deactivate the automatic centering feature (the CST indicator should not flash).
In some games, it is also necessary to invert the forces (in this case, select "negative forces" or move the cursor to "100%" in your game's options management interface). In other games, the forces should not be inverted (in this case, select "positive forces" or move the cursor to "+ 100%" in your game's options management interface).
- The pedal set does not operate correctly in "Separate" mode
(e.g. in the game, the selection cursor moves around on its' own)
Quit the game and switch your pedal set to "Combined" mode. Launch your game again, then configure your racing wheel once more via your game's options management interface.
SAFETY RECOMMENDATIONS AND INFORMATION
- When connecting your racing wheel and during the automatic calibration phase: to avoid calibration errors, do not turn the racing wheel, and do not press any of the pedals or buttons during the calibration phase.
- If you do not plan to use your racing wheel for a long time, to avoid pointless electricity consumption and to prevent any damage to your racing wheel, disconnect the power adapter from the racing wheel. Remember to reconnect the power adapter before you start playing again!
- Your racing wheel includes a Force Feedback feature: Keep young children away from your racing wheel, particularly during the automatic calibration phases.
TECHNICAL SUPPORT
If you encounter a problem with your product, please go to http://fs.thrustmaster.com and click Technical Support. From there you will be able to access various utilities (Frequently Asked Questions (FAQ), the latest versions of drivers and software) that may help to resolve your problem. If the problem persists, you can contact the Thrustmaster products technical support service ("Technical Support"):
By email:
In order to take advantage of technical support by email, you must first register online. The information you provide will help the agents to resolve your problem more quickly. Click Registration on the left-hand side of the Technical Support page and follow the on-screen instructions. If you have already registered, fill in theUsername and Password fields and then click Login.
By telephone:
| United Kingdom | 08450800942Chargesat local rate | Monday to Friday from Noon to 4pm and 5pm to 10pmSaturday from 9am to Noon and 1pm to 7pmSunday from 9am to Noon and 1pm to 4pm |
| United States | 1-866-889-5036Free | Monday to Friday from 7am to 11am and from Noon to 5pm Saturday and Sunday from 7am to Noon (Eastern Standard Time) |
| Canada | 1-866-889-2181Free | Monday to Friday from 7am to 11am and from Noon to 5pm Saturday and Sunday from 7am to Noon (Eastern Standard Time) |
| Denmark | 80887690Free | Monday to Friday from 1pm to 5pm and 6pm to 11pm (English)Saturday from 9am to 1pm and 2pm to 8pm Sunday from 10am to 1pm and 2pm to 5pm |
| Sweden | 0200884567Free | Monday to Friday from 1pm to 5pm and 6pm to 11pm (English)Saturday from 9am to 1pm and 2pm to 8pm Sunday from 10am to 1pm and 2pm to 5pm |
| Finland | 0800 913060Free | Monday to Friday from 2pm to 6pm and 7pm to Midnight (English)Saturday from 10am to 2pm and 3pm to 9pm Sunday from 11am to 2pm and 3pm to 6pm |
WARRANTY INFORMATION
Worldwide, Guillemot Corporation S.A. ("Guillemot") warrants to the consumer that this Thrustmaster product will be free from material defects and manufacturing flaws for a period of two (2) years from the original date of purchase. Should the product appear to be defective during the warranty period, immediately contact Technical Support, who will indicate the procedure to follow. If the defect is confirmed, the product must be returned to its place of purchase (or any other location indicated by Technical Support).
Within the context of this warranty, the consumer's defective product will, at Technical Support's option, be either repaired or replaced. Where authorized by applicable law, the full liability of Guillemot and its subsidiaries (including for indirect damages) is limited to the repair or replacement of the Thrustmaster product. The consumer's legal rights with respect to legislation applicable to the sale of consumer goods are not affected by this warranty.
This warranty shall not apply: (1) if the product has been modified, opened, altered, or has suffered damage as a result of inappropriate or abusive use, negligence, an accident, normal wear, or any other cause not related to a material defect or manufacturing flaw; (2) in the event of failure to comply with the instructions provided by Technical Support; (3) to software not published by Guillemot, said software being subject to a specific warranty provided by its publisher.
Additional warranty provisions
In the United States of America and in Canada, this warranty is limited to the product's internal mechanism and external housing. Any applicable implied warranties, including warranties of merchantability and fitness for a particular purpose, are hereby limited to two (2) years from the date of purchase and are subject to the conditions set forth in this limited warranty. In no event shall Guillemot Corporation S.A. or its affiliates be liable for consequential or incidental damage resulting from the breach of any express or implied warranties. Some States/Provinces do not allow limitation on how long an implied warranty lasts or exclusion or limitation of incidental/consequential damages, so the above limitation may not apply to you. This warranty gives you specific legal rights, and you may also have other legal rights which vary from State to State or Province to Province.
COPYRIGHT
© 2008 Guillemot Corporation S.A. All rights reserved. Thrustmaster® is a registered trademark of Guillemot Corporation S.A. Windows® and Windows® XP are registered trademarks of Microsoft Corporation in the United States and/or other countries. Pentium® is a registered trademark of Intel Corporation. All other trademarks and brand names are hereby acknowledged and are property of their respective owners. Illustrations not binding. Contents, designs and specifications are subject to change without notice and may vary from one country to another. Made in China.
ENVIRONMENTAL PROTECTION RECOMMENDATION
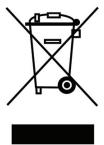
At the end of its working life, this product should not be disposed of with standard household waste, but rather dropped off at a collection point for the disposal of Waste Electrical and Electronic Equipment (WEEE) for recycling.
This is confirmed by the symbol found on the product, user manual or packaging.
Depending on their characteristics, the materials may be recycled. Through recycling and other forms of processing Waste Electrical and Electronic Equipment, you can make a significant contribution towards helping to protect the environment.
Please contact your local authorities for information on the collection point nearest you.
FAQs, tips and drivers available at www.thrustmaster.com
Ferrari F430 FORCE FEEDBACK
RACING WHEEL
Pour:PC
INFORMATIONS RELATIVES À LA GARANTIE
DE PEDAALSET CONFIGUREREN
INFORMATIE MET BETREKKING TOT DE GARANTIE
Yayestaspreparedaporarcorrer!
PykoBoIDCTBO noIb3OBATeJIa
TEXHUNCHECKHEXAPAKTEPNCCTUKI
1 Manhiyptop D-Pad
2 KhoNka yCnna (F)
3 + 10 uncpobbIe KOMaHnHbIe KHOJIK
4 2 nocneIobateBnHbX pBuHa nepeKlnOueHnna nepeaay (BepxHnN HnKnn)
5 Oco6eHnOCTn nepeKIOUaTeIa "Manettino" (He6oIbwoi nepeKIOUaTeIb):
-ODINIOBOPOTbIy BbIKHQUaTeJIb C PANTbIO IO3NUIAIMM;
- OДна KНОПКа;
6 INHIMKATOP CST
7 BbI6Op peKIMa C nOMOu bO cTaNepa:
-pyuHou pexum "Manettino";
N
- aemomamuueckuu pexkum "Manettino" (AM)
8 AanTep nntaHn
9 USB-ka6eIb npa3bem
10 Ha6opa Ka6eJeI dI neJaIe I pa3bEm
11 CnCTema KpenJIeHnIa
12 MetaIIIeCKN KpeEckHbB BnHT
YCTAHOBKA THOHOUHOFO PYJIA
UctaHOBka pyna Ha cTone nIIN npnbOpnoDocke
- YctaHOBtE roHouhbl pyIb Ha cTone IINI JIO60I pyrO rOp3oHTaIbHOI pIoCKO IN yCTOuHBOI NOBepxHOCTN.
2.BctabTe XpeNEXHH BmHT (12) B CImCTeMy XpeNEXHH (11) n 3aKpyUHbIte ETo (noOBpaUHbIpaOTMB YacOBOI CTpENK) B cNeuaJIbON OTHBcTmN, KOtOpoe HaxoDITcN oJd rHOOnHbIM yPnEM, Do TEs NOP, NOKA yCTPOCTBHO b YeIDet NoHOTCbIO zAKpEHNHO.
PENJYIPPEKDEHNE: 3anpeaetcra 3akpyuBaTb BnHT 6e3 nCnoIb3ObaHna CnCTEmbl KpennneHn!
(BblMOxTe NOBpeDntb rOHOuHbI pyIb!)
IyoMOnJUaHnOfynKznaA BOMATmueCKoJeHTPOBKn He aKtINBnPoBaHa.
MhOme HOBbIe Irgpbl IMeIO T CBOI peXm ABOTMaTHueCKO CEHTPOBKn.
NtOMy, HAcTOBENbIe POKOMEHUcyTcB (B 60JIbMHNCTBe CnyaEB) OTKNIOHTb FyHKNUO ABOTMATUHECKo CEHTPOBKn pyu I NO3BOITNfIrpe CAMOCTOBENb HAcTPONTb ee. KaeeCTBO Force Feedback (OB4PATHO CB83n O yCmHINo) BdyET 3NaHHTBOH yUYuHSe.
Pekmm AGBTMATEHECKO IeHTPOBKN pIeMMUeCTBEHNO PnIMMEHReTcK INpAM, KOTOpbHe He IMeHT npamet Force Feedback (ObpaTHoN CB3N no yCnHIO) INy yctAHabJIbAOt 3OT peKMHa TOJIbKO "Hn3Kn" yOBeBH.
HACTPOKKAФИКЦАВТOMATИССКОДСЕНТРОВКИСПOMOДБЮ П
- Hactpoika nhtepceca "PaheJIb YnpaBHeHna" haxOHTcRa Na cTpaHnue 2.
- YTo6bI OTKIOUHTb cyHKUHIO ABTomATnueckO uENTPOBKM, Bbl6epuTe "By the game"(BblIOJIHNtB bInrpe).
- YTo6bI BKJIHOuHTbФyHKUIO aBtOMaTnueeCKoI ΚEHTPOBkI, Bbl6epHte "By the game"(BblIOJIHNITb B nIrpe).
B 3TOM pexime moxho hactpanBaTb noka3aTeIb abTomatueckoi zentpupOBKn (ot 0 do 100).
HACTPOIKA ΦYNKUABTOMATNUECKOJ CHTPOBKN IOMOJIbIO OBOPYIOBAHNA
YtObblA KtBNIOBAt bI IIN OTKIIIOHTb FyHkuNIO ABO TMAUHECKO CEHTPOBKN HENOCpeCTBeHNHO BO BPEMnI npbl, HAKMNTE KHONY "Force" (UCNIME) (2), KOtOPaH HAXOITcRA h puye. Nocne AKTBAuNl nnfHKUNn nokaaTeIb ABOTAMUHECKO CEHTPOBKn 6yDet COOTBEcTBBOATb 3NaueHNO, npdeBaPnteHbNO yka3AHNOHY M BACrpoKkax "By the wheel" (BbInONHtB bIrpe) B INTEpFeCe "Control Panel" (PaHEnIynpaJIbHnI).
MHΦOPMALIg O TAPAHTIIN
Bo Bcex cTpaHax, Kopnpaunia Guillemot Corporation S.A. ("Guillemot") daet rapaHTnHO ha n3dEe Htrustmaster B TOM, YTO 3TN i3dEeNHe IMeOT deFeKToB MatepnaOB INI npOn3BOCTBa HA (2) rOda OT dAby NOKyKN. Ipn ObhApyKeHm DeFeKTa B TceHm rapaHTnHO rOpKa HEMdNEHO CBXkNTeCb CO cyJx60B TeHNueCKo NOdepKKn, KOTOPa pa3bAcHIT NOcpeobateHbOCTb DeiCTBn. Ecn DEeKET NOdTBePINTCA, INeDEe Heo6XoIMo BEpytNo MeCTy npIO6PeTeHn (INn DpyrOe, yka3aHHoe CnyK60 TeHNueCKo NOdepKKn).
Ecni HnncpnaHoe n3dJIe ne nonadaet noJ yCNoBn rapaTm, Oho 6yIe Tn6o zAmHeHo, n6oO tpeMOHTnPOBaHO. Pnri NaHmN peryuNpyKoEzo kAOKoHaTeJIbCTBa, Hn60JIbUaO TBeCTCBHEOCTb (BKNIOUa KocBENHeYb6tKn) KopnpaunGuilleMeT n ee DooepHNx npEaPnRTM orpaHueHa peMOTHOM nInz 3aMeHO n3dJIe Thrustmaster. OpDnueckne npaba NotpeBnteR B OTHOWeHm3aOKoHDoATEbCTBa, npImeHnMoR K npOdaXam nOpTeBnteLbCKnx ToBapOB He BnINrHOT HA YaKa3AHHbTE rapaHTNHBe o63aTeJIbCTBa.
3ra rapahtnHa he paacnpocptpaHReTc: (1) Ha 3dennia MoDmphiuropoBaHbIe, BckpbItbe, dopa60taHHBe IIN NOBpexdeHHBe B pe3yIbTaTe HnepaBnHbHO IIN rpy6Oro o6paueHIn, HeOCMOTpTeIbHocN, HeCACTHO rClyAa, HOPMaHbHO n3HOca, INI INMeUOpHe IIO6O npTyOre DeEeKt, HE C8a3AHbN C KaYeCTBO MATEPnAna IIN N3rOToBHeHIn; (2) B clyAae Heco6nIODeHHn HnCTpyKun, BblaHHix TexNHecKeON NoDpeKKoi; (3) HA npOrpaMMHe npOkyTb, pa3pa60taHHBe He Guillemot, paocnpoc7raTcRapantn/OTBETCBEHNOCT bp3pa60TuKa npOrpAM.
ABTOPCKOE TIPABO
© 2008 Guillemot Corporation S.A. Bce npaba 3aunuHb. Thrustmaster® ABnIeTcA zaprrnctprupobahno Tropobm Topko GMillemot Corporation. Microsoft® Windows® ABnIeTcA zapeirnctprupobahno Tropobm Topko Microsoft Corporation B CoeJInHeHbXs lTaTax AmePkn N/nnDpyrNx cTpaHax. Bce npohme Tropoble MapKn n FpIMeHNbIe H3BaHAnB pImBeDEHNbIe B daHHom DOKyMEnTe, RApJIOTCa CO6CTBHeONCTBO COOTBETCTBYOux BnAdJeLbcE. VInIOCTpaUmn MOryt He COOTBETCTBOBaT BHeUNHEMy BVdY/ФYHKUqm KOnKpeTHORO n3DeNIIa. Coedjkanne pyKoBOvCTBa, KOCHPTyUcn TexNuCeCKne XapKeTepNCTKn N3DeNIIa N3MeHJOTCa 6e3 npeBapntelhoro yBeOMJIeHn I 3aBcrt AT cTpaHb npio6peTENHa.
PEKOMEHDAUIMIIO3AUHTEOKPYXAIOUCEI CPEDbl
POnce OOKHAnHc Pocka Cnyk6bl DaHnHOe 3dEJIne He cneJyET yTNiN3IPOBaTb BMeTe C 6blTOBbIM MycOPOM, HO B LyNKte C6opa OTXoD0j 3NeKtpUeCKOrO I 3NeKtpOHOrO 6obpyOBAHN.
Данhoeуka3aHne NOIITBepKdaETC9OoTBeTCTByUOcIM CmBOJOM,HaHEeHHbIM Ha ⅢdJIeNpykoBoDCTBO NOIb3ObaTeIINyIYtaKOBky.
B 3aBmCmOCTN OT cBOIcTB, MATEpHaJIbI MOrY nepeDaaTbcra B NOBtropHyo nepepa60TK. NOBtOPHae nepepa60TKa OTxODOB 3NeKTPMueCKOrIO n 3NeKTPHOHHORO o6OpyDabAHMO MJeETN 3HaUHTeINbHbIKnAD B CoXPAHeHMe OKpyKaHOSe CpeDls.
O6PbTHeB C MeTbIe oPraHb I Bnactu 3a HnHΦopMaueiδ O 6nHexKaHiem npHKTe npHEMA TAKHX OTXoD0B.
Ferrari
OFFICIAL LICENSED PRODUCT
PRODUCED UNDER LICENSE OF FERRARI SPA. FERRARI, THE PRANCING HORSE DEVICE, ALL ASSOCIATED LOGOS AND DISTINCTIVE DESIGNS ARE TRADEMARKS OF FERRARI SPA. THE BODY DESIGNS OF THE FERRARI CARS ARE PROTECTED AS FERRARI PROPERTY UNDER DESIGN, TRADEMARK AND TRADE DRESS REGULATIONS.
PRODUT FABRIQUE SOUS LICENCE ACCORDÉE PAR LA SOCIÉTÉ FERRARII SPA. LA DENOMINATION FERRARII, L'EMBLEMÉ DU CHEVAL CABRE, AINSIS QUE L'ENSEMBLE DES LOGOS ET SIGNEDS DISTINCTIFS ASSOCIÉS CONSTITUENT LA PROPRIÉTE DE LA SOCIÉTÉ FERRARII SPA. LE DESSIN DE LA CARROSSSEIRE DES VOITRES FERRARIÉ EST PROTEGÉ EN TANT QUE PROPRIÉTE DE LA SOCIÉTÉ FERRARIÉ EN VERTU DE RÉGLEMENTATIONS APPLICABLES AUX DESSINS, MODELS, MARQUES COMMERCIALES ET CONFIGURATIONIS VISUÉLLES (TRADE DRESS).
HERGESTELL UNTER LIZENZ VON FERRARI SPA. FERRARI, DAS EMBLEM DES TANZELLEN DER PFERDS, ALLE DAMIT ZUSAMMENHANGENDEN LOGOS UND CHARACTERISTischen FORMEGBUNGEN SING EIGENTUM DER FERRARI SPA. DAS KAROSSERIE-DESIGN DER FERRARIAUTOMOBILE IST NACH DEN GESETEN BYDEN DESIGN, WARENZEICHEN UND HANDELSaufMACHUNG (TRADE DRESS) ALS EIGENTUM VON FERRARI URHEBERRECHTLICH GESCHUTZ.
- SETTING UP YOUR RACING WHEEL
- Place the racing wheel on a table or a desktop
- Attaching the racing wheel to a cockpit
- Connect the pedal set and the power adapter to the racing wheel
- PC INSTALLATION
- AUTOMATIC RACING WHEEL AND PEDAL SET CALIBRATION
- CONFIGURING THE PEDAL SET
- - SETTING THE PEDAL BASE MODE USING THE SOFTWARE
- - SETTING THE PEDAL BASE MODE USING THE HARDWARE
- Note:
- SETTING THE AUTOMATIC CENTERING FEATURE
- - SETTING THE AUTOMATIC CENTERING FEATURE USING THE SOFTWARE
- - SETTING THE AUTOMATIC CENTERING FEATURE USING THE HARDWARE
- ADJUSTING FORCE FEEDBACK EFFECTS (on Page 2 of the Control Panel interface)
- USING THE 5-POSITION MANETTINO CONTROLLER
- MANETTINO IN MANUAL MODE
- MANETTINO IN AUTOMATIC MODE
- TROUBLESHOOTING
- SAFETY RECOMMENDATIONS AND INFORMATION
- TECHNICAL SUPPORT
- By email:
- WARRANTY INFORMATION
- Additional warranty provisions
- COPYRIGHT
- ENVIRONMENTAL PROTECTION RECOMMENDATION
- Ferrari F430 FORCE FEEDBACK
- INFORMATIONS RELATIVES À LA GARANTIE
- DE PEDAALSET CONFIGUREREN
- INFORMATIE MET BETREKKING TOT DE GARANTIE
- TEXHUNCHECKHEXAPAKTEPNCCTUKI
- YCTAHOBKA THOHOUHOFO PYJIA
- UctaHOBka pyna Ha cTone nIIN npnbOpnoDocke
- HACTPOKKAФИКЦАВТOMATИССКОДСЕНТРОВКИСПOMOДБЮ П
- HACTPOIKA ΦYNKUABTOMATNUECKOJ CHTPOBKN IOMOJIbIO OBOPYIOBAHNA
- MHΦOPMALIg O TAPAHTIIN
- ABTOPCKOE TIPABO
- PEKOMEHDAUIMIIO3AUHTEOKPYXAIOUCEI CPEDbl
- Ferrari
- OFFICIAL LICENSED PRODUCT
Brand : TRUSTMASTER
Model : F430 FFB
Category : Racing wheel